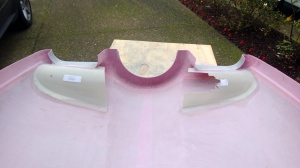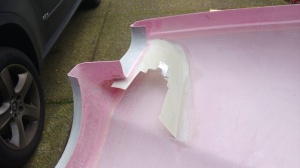
I got right back into the fiberglass mode and worked on the upper cowling this morning. After letting the epoxy and filler cure overnight, it was time to clean up the fillet and epoxy that was applied to help transition the air ramps into the cowling assembly itself. I used some 60 grit paper and did the old – sand and sand and sand trick. After an hour or so I was able to get the ramps sanded down nicely there are only a few areas that need some epoxy to clean up some minor voids.
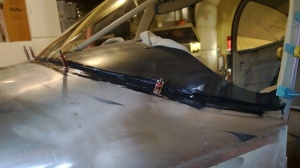
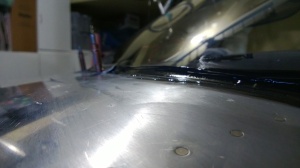
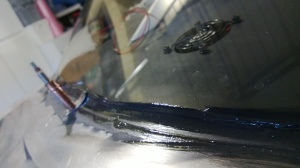
Next up, I received my shipment from Aerosport Products with the Lord Epoxy gun I was waiting for. Since the windshield was mostly ready to go, I switched to get that done. I closed up the garage and heated up the garage to ensure the epoxy would be applied at the right temperature. I made up some temporary “fingers” to hold the windshield in place along the upper and aft perimeter and used some clecos to hold them in place. I scuffed up the canopy flange (the windshield was already scuffed previously). I removed the interior protection from the window and then applied Lord Epoxy to the canopy flange. I placed the windshield in place and clamped and positioned into place. I used some PPG reducer to clean up any that squeezed out. I also cleaned up along the interior and applied a fillet of lord epoxy to ensure a smooth transition from the canopy to the windshield on the inside.
After letting the epoxy cure for a while I mixed up some additional epoxy and added black tint from Tap Plastics. I used this to create a fillet along the bottom of the windshield where it meets the upper forward fuselage. It gets tinted black to ensure any that is seen on the inside blends in with the black glare shield area. I reapplied the lower fingers along the windshield and left them cleco’d for now until the epoxy cures and I can pop rivet them in place.
Lastly, since all the epoxy had to set and cure, I decided to switch to a minor task before finishing up the day. So I uninstalled my oil cooler. I’ve read that other builders have had success in maximizing their oil cooler performance by making a small modification. There are some U channels that run from side to side on the cooler and allow air to escape before it passes through the cooler fins to cool the oil. So you can apply a bead of RTV to both sides to help seal this area up and prevent the air from escaping.